Multi-Subject Region-Of-Interest Analysis
- Details
- Category: ROI Analysis
- Last Updated: 11 April 2018
- Published: 11 April 2018
- Hits: 7849
Background
An important way to analyze fMRI experiments is the investigation of time courses from restricted brain areas, which were "localized" (mapped) in preceding “localizer” experiments (e.g., O'Craven & Kanwisher, 2000, J Cogn Neurosci, 12, 1013-1023): For each subject, several brain areas (i.e. V5, FFA) are determined once with a simple, standardized stimulation protocol in a localizer run. In subsequent main experiments, the time courses of the premapped ROIs (ROI = region-of-interest) are statistically analyzed. This approach provides two main advantages over a normal whole-volume mapping approach, increased statistical power and spatial correspondence mapping across subjects. The ROI-based analysis approach is statistically powerful because only a small number of a priori specified ROIs are analyzed. In addition, the localizer runs provide homologue functional areas across subjects, which allows to perform optimal statistical analysis across subjects. A disadvantage of this approach is that the determination of homologue functional areas is somewhat subjective and might work only for a limited number of brain regions. Another disadvantage is that this approach tends to neglect the role of other coactivated brain areas by narrowly focusing on the preselected regions.
BrainVoyager has a multi-subject ROI analysis tool, which automatically uses subject-specific definitions of VOIs when accessing the data of a particular subject. This approach contrasts with the Talairach coordinates approach in which the same x, y, z coordinates are used to integrate the data across subjects. Subject-specific ROI analysis provides a very powerful approach for the analysis of group data because it provides an optimal across-subject data integration.
Exercise
BrainVoyager allows to determine ROIs based on functional analysis (VMPs, SMPs) as well as through direct anatomical specification (VMRs, SRFs). The ROIs are saved as a set of VMR voxels and are called "VOIs" (VOI = volume-of-interest) or as a set of SRF vertices and then they are called “POIs” (POI = patch-of-interest). One or more defined VOIs are saved in a VOI file. POIs defined on a surface can be converted into corresponding VOIs. The defined VOIs are accessed, processed and visualized in the “Volume-Of-Interest” dialog. The ROI tool provides additional features including the retrieval of VOI time courses from any functional experiment (VTC files) and the execution of multi-subject VOI-GLM analyses. The following example describes the ROI tool with the simplest case of two subjects.
I. Define subject-specific VOIs
- We will visualize the data overlaid on the 3D data set of subject 1. Load the VMR data set “S1_TAL.vmr”.
- Invoke the “Volume-Of-Interest” dialog by clicking on “Analysis -> Region-Of-Interest analysis…”. If the dialog is not empty, i.e. if it shows VOIs in the “Volume-Of-Interest list”, click the “New” button. This will prepare a new empty VOI data structure. You may now close the dialog. Note that closing the dialog is not strictly necessary since the dialog may be open at any time since it does not block working in other parts of the program (as opposed to BrainVoyager 2000).
- Invoke the “Overlay GLM” dialog by clicking the “Overlay General Linear Model…” in the “Analysis” menu. Load the GLM file “ClockTaskTwoSubjects.glm” using the local “File -> Load GLM…” menu.
- “+”-select the predictor “Subject 1: Auditory stimulation” and click “OK”.
- Enter the “Volume Maps” dialog. Select the VMP entry corresponding to the GLM contrast. Now turn off FDR by clicking “Use statistic value” in the “Thresholding” field and set the minimum threshold to “4.0” in the “Min:” spin box of the “Confidence range” field. Now click Update VMR” and "Close".
- Set the “Range” value in the “Talairach” tab of the “3D Volume Tools” dialog to “100”. This will allow us to select a large functional cluster as a region-of-interest.
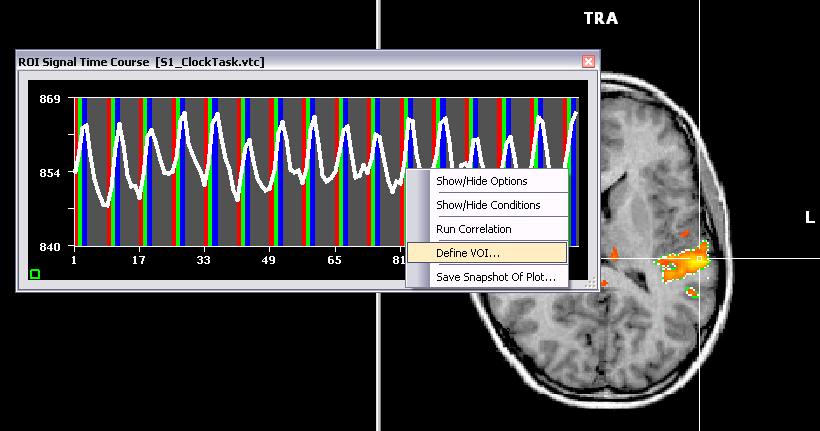
- CTRL-click with the left mouse in the auditory cortex in the left hemisphere (see below). This will show a corresponding “ROI Signal Time Course” window.
- Right-click (CTRL-click on the Mac) at an arbitrary point within the time course window to get a context-menu. In the context menu click the “Define VOI” entry.
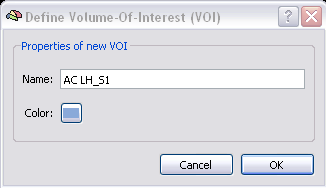
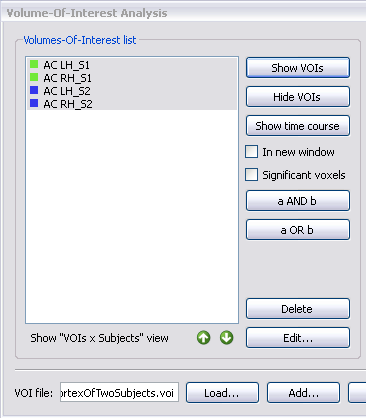
- A “Define Volume-Of-Interest (VOI)” dialog appears. As the name for the VOI, enter “AC LH_S1” (AC = auditory cortex, LH = left hemisphere). The final part of the name “_S1” is very important because the program uses this part to identify the subject (“S1”) for which the VOI has been defined. Click the “OK” button. The “Volume-Of-Interest Analysis” dialog will appear and show the defined VOI in the “Volume-Of-Interest” list.
- Locate the auditory cortex in the right hemisphere. CTRL-click that region and define the VOI “AC RH_S1” following the description above for the VOI in the left hemisphere.
- Now we repeat the same steps for the auditory cortex of the second subject. Invoke the “Overlay GLM” dialog and “+”-select the predictor “Subject 2: Auditory stimulation” and click “OK” (all other predictors should be turned off, i.e. neither “+” nor “-“ selected).
- CTRL-click with the left mouse in the auditory cortex in the left hemisphere (see below). This will show a corresponding “ROI Signal Time Course” window.
- Right-click (CTRL-click on the Mac) at an arbitrary point within the time course window to get a context-menu. In the context menu click the “Define VOI” entry.
- In the appearing “Define Volume-Of-Interest (VOI)” dialog, enter “AC LH_S2” as the name of the VOI. Click the “OK” button.
- Locate the auditory cortex in the right hemisphere. CTRL-click that region and define the VOI “AC RH_S2” following the description above for the VOI in the left hemisphere.
II. Define subject-specific VOI colors
Now we have defined 4 VOIs, 2 for each of the two subjects. The VOIs received a default color. We will now change the VOI color in such a way that the VOIs belonging to the same subject will have the same color.
- Select the first VOI “AC LH_S1” and then click the “Edit…” button. Click the color button in the appearing “Define Volume-Of-Interest” dialog and select a green color in the “Select color” dialog. Click “OK” to close the “Select color” dialog and then again to close the “Define Volume-Of-Interest” dialog.
- Repeat the same steps for the second VOI “AC RH_S1” so that it gets the same color as the first VOI.
- Select the third VOI “AC LH_S2”. Follow the same steps as before but select a blue color for this VOI.
- Repeat the steps again for the VOI “AC RH_S2” and select the same blue color.
- Now save the created VOI data by clicking the “Save” button. As the VOI file name, enter “AuditoryCortexOfTwoSubjects.voi” and click the “Save” button.
- Now we visualize the four VOIs. In order to see the VOIs better, we turn off the overlayed VMP map. Deselect the “Overlay 3D map” option in the “Spatial Transf” tab of the “3D Volume Tools” dialog.
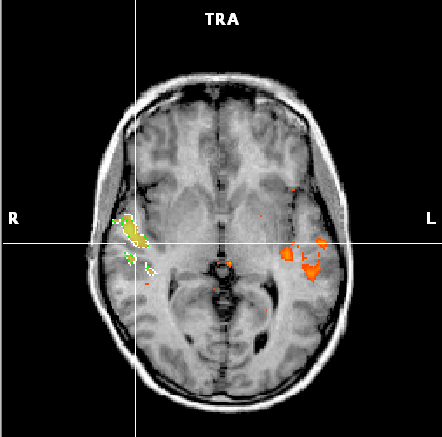
- Now select all four VOIs in the “Volume-Of-Interest Analysis” dialog by using CTRL-clicks (adding single entries) or SHIFT-clicks (adding a range by two clicks). Now click the "Show VOIs" button. You should now see an image similar to the one below.
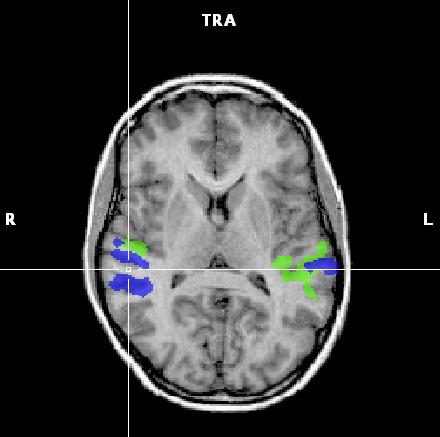
We can observe that despite Talairach space, the VOIs of the auditory cortex do not completely match across the two subjects.
III. Multi-subject VOI-GLM analysis
We now compute a GLM across the data sets (VTCs) of the two subjects. We use the voxels defined in the VOIs for each subject to access the time course data.
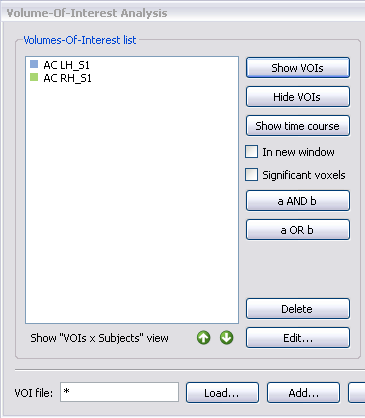
- Until now we have defined the four VOIs separately. We now switch to the subject-specific VOI analysis mode. In this mode, the program analyzes the VOI names and separates the core VOI definition from the subject identifier at the end of the VOI name (“__”). Click the “Show VOIs – Subjects view” option. You will now see that the “Volumes-Of-Interest list” shows the defined VOIs separated for the core VOI part and the subject part.

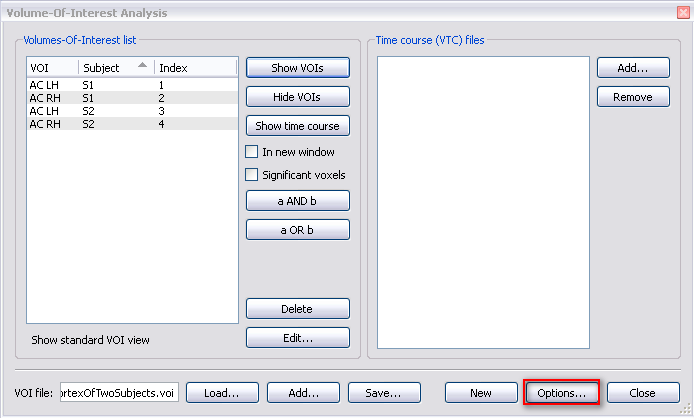
- Now click the “Options…” button which will invoke the “Volume-Of-Interest Analysis Options” dialog.
- Select the multi-subject design matrix “ClockTaskTwoSubjects.mdm” in the “Design matrix file for GLM functions below” field.
- Change to the "VOI GLM" tab and select the “AC LH” VOI in the “Create GLM graphs and tables for selected VOI” field and then click the “VOI GLM” button. In the appearing "ROI GLM Specifications" dialog click on "Fit GLM". You will see now the result of the VOI GLM in which the subject-specific VOI files have been used to concatenate the functional data of the two runs (one from each subject).
- Repeat the analysis for the “AC RH” VOI.
- Now compare the subject-specific VOI approach with the suboptimal approach in which the same VOI is used to concatenate the data across runs. Uncheck the “Use subject’s VOIs for time course access” option. Now you will see all four VOIs in the “Create GLM graphs and tables for selected VOI” field. Select one of the VOIs and click the “VOI GLM” button. Compare the result with the ones obtained above. Repeat this step for the other three VOIs.
- Explore the other options of the “Volume-Of-Interest Analysis Options” dialog.