Scripting with BrainVoyager
The present webpages are intended to help you to build your first scripts with BrainVoyager using a visual programming editor. The instructions are represented as blocks which you can assemble to create scripts. At present, the script can be saved in JavaScript or Python and run into BrainVoyager without further work. The editor is based on Blockly. The image below show you an example of the visual scripting editor.
On the left of the image, you have a toolbox. Clicking on any item will give you access to scripting commands. In the middle, the visual editors with some example blocks to run a loop, open a BrainVoyager document and execute a function on the open document. On the right hand side, the corresponding script automatically generated, here in JavaScript.
The buttons on the top allow you to load a previously saved script created with the visual editor, save the current script both in xml for further use with the visual editor, and in JavaScript or Python for further use with BrainVoyager. The right hand side button allows you to clear all blocks from the workspace to start a new script.
This visual editor is under development. We advice you to come and check regularly this webpage where we will try to report all known issues that we cannot solve directly but also major changes, for example going from BrainVoyagerQX to BrainVoyager. At the moment, the created JavaScript works for both version 2.8 and version 20.0. Python script are only for BV 20.0 and higher. The list of available functions should increase on a regular basis. If you need some specific functions not included yet, send an email to noirhomme at brainvoyager dot com. You may also report there all bugs and trouble with the visual editor.
You may now start scripting in JavaScript or in Python. For further information, read the scripting documentation below.
Blockly
Blockly is a software library developped by Google. The Blockly editor uses interlocking, graphical blocks to represent code concepts like variables, logical expressions, loops, and more. It allows users to apply programming principles without having to worry about syntax or the intimidation of a blinking cursor on the command line.
Basic usage of blocks can be learn throught the exercices proposed on Blockly
How to start
The toolbox
On the left of the visual editor, you will find the toolbox. Clicking on a section will open a menu where you can select the next block you are interested in.
The first part of the toolbox contains standard scripting blocks with logical operations, loops, basic math and text. The middle part allows you to create variables, functions or lists which are a specific type of variable allowing to contain multiple values. The bottom part of the toolbox contains BrainVoyager specific functions.
Hovering with your mouse pointer over a block will show you some tips about the use of the function and the expected parameters.
For some blocks, you will find that these parameters are already filled by "shadow" blocks. They are there to help you to find the right value to feed to the block. When possible, they contain the default BrainVoyager values. You may change the values of these "shadow" blocks as you like. You may also replace them by new block by dropping the block in the parameter position. "Quotes" in the block indicate that this is a text block and that text input is needed, for example a file name. If the default parameters suit your need, you do not need to touch anything.
Blocks can be connected on the left, right, top and bottom.
Left connections indicate that the block as an output. This could be a number, a text or a variable. Right connections indicate that the block needs parameters, like a file name. Leaving a parameter connection empty may work perfectly fine with some blocks but not with others, be careful. The visual editor will not issue any warning but your script will not run properly in BrainVoyager. The visual editor is still not fully "safe". Top and bottom connections are used by block without a direct output, for example when you execute a function on images or print to the log, there is no output for the program itself, only for the image or log.
Connections can also be internal.

Internal connections are parameters for the block like the right connections. The fact that the connections are internal or right is purely based on the "design experience" of the developper. All FMR, VTC, VMR, MESH blocks will need as first paramenter a brainvoyager document of the corresponding type opened with either the "open" block or the appropriate "create" block.
Visual editor
The middle window is the visual editor. You can drag and drop blocks there and arrange them to write your script. The program will read the blocks from left to right and top to bottom.
Right clicking on a block will open a block menu.
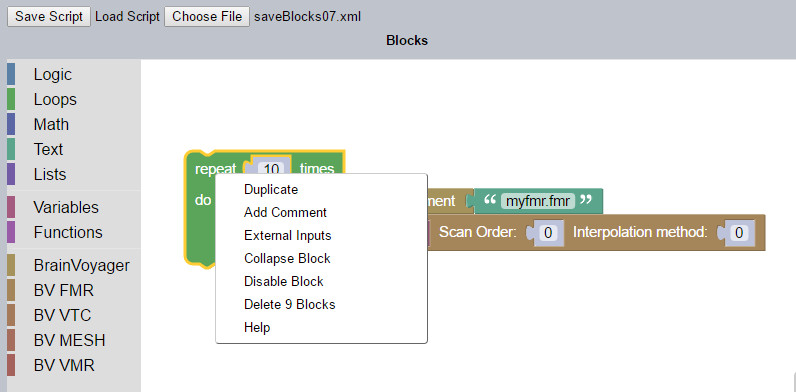
The menu allows you to duplicate the block (and, eventually, the attached blocks), add a comment related to this block, for example "check second parameter", Collapse a block or group of blocks to reduce their size in the visual editor, delete the block or get help related to this block. The Help button is not implemented yet, and will only sent you to a general BrainVoyager webpage. For help, move your mouse cursor over the block and wait.

Javascript/Python code window
The right window contains the automatic translation of the blocks into JavaScript or Python code.
This code can be executed directly by BrainVoyager. You may either use the  button or
select and copy the code from the Javascript/Python window and copy it into BrainVoyager script/Python editor. For Javascript code, the script editor can be opened
via the “Scripting...” menu option in BrainVoyager, "Edit and Run Scripts...". The Python editor can be accessed throuhg the "Python"
menu option.
button or
select and copy the code from the Javascript/Python window and copy it into BrainVoyager script/Python editor. For Javascript code, the script editor can be opened
via the “Scripting...” menu option in BrainVoyager, "Edit and Run Scripts...". The Python editor can be accessed throuhg the "Python"
menu option.

For more information on BrainVoyager script editor, see the BrainVoyager Scripting Reference manual, chapter 2.
Save and load script
When you are done with your script press the button on the top left of the page. You will be asked to save two files. Depending of your browser,
the file interface and the order of the files may change but this has no influence on the resulting files. Some browsers may even ask you to allow to save multiple files, just press allow.
Do not forget to change the default file name to reflect the script function.
The file ".xml" is an XML file which contains the block structure and can be used later to load the script back in the visual editor using the button next to "Load script". This button has different shape depending of your browser. The ".js" file is a JavaScript file which contains a BrainVoyager compatible version of your script. You may save this file in the in the default directory for scripts and script projects, which is /(My) Documents/BVExtensions/Scripts/. If you save your script there and there is no scripting error, you will see your script appearing in the "Scripting" menu the next time you open BrainVoyager. The ".py" file is a Python file and can be saved in /(My) Documents/BVExtensions/PythonScripts. The script will then appear in the Python editor the next time you start BrainVoyager.
First scripts
If you are not familiar with scripting/coding, we recommend you start with some exercices from Blockly. The maze and pond tutor are the most appropriate to complete before starting with BrainVoyager scripts.
The scripts proposed here are taken from the BrainVoyager "Getting starte guide for scripting" and show you the basic blocks. The number in front of the script refer to the manual section.
Note that the resulting scripts will not always be exaclty the same than the scripts printed in the getting started guide. This is due to the fact that each block does not always relate to a single command. Sometimes, a block may call two or more commands. This simplify the number of block but may slightly complexify the script. Loop and condition blocks may also change sligthly from the standard use. They are written to be safe first and accomodate many different situations.
Chapter 2 - Script to open an FMR project

For this script to run properly, you may have to create the directory pointed by the function "BrainVoyagerQX.PathToSampleData" and have downloaded the sample data. Alternatively, write the full path to one of your vmr dataset in a single text block.
Run the script via the “Run” button of the BrainVoyager scripting editor or directly from the “Scripts” menu in BrainVoyager. The VMR project will now be opened by BrainVoyager.
Note that we did not use the output option of the "Open Document" block and that for this block this is just fine.
Chapter 3 - Using filenames
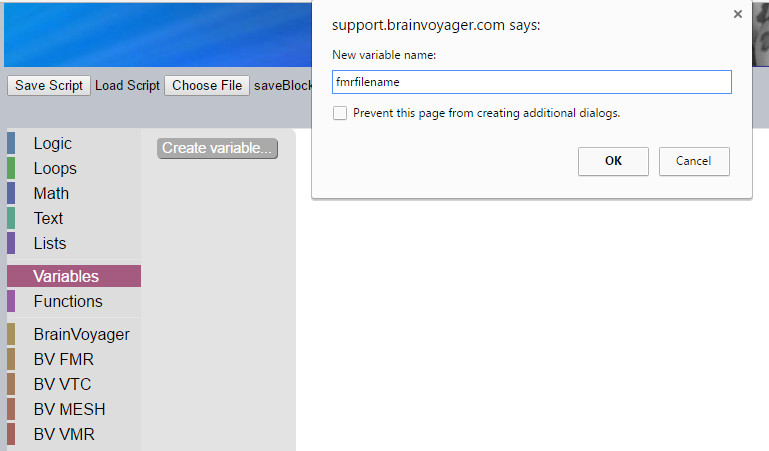
In this script, we first need to create a variable. Press "Variables" in the toolbox, then create variable, you will be prompted for the name of the new variable. For this script type "fmrfilename" and press "OK".
New blocks are created by the visual editor which allow you to assign a "value" to the variable, change the variable or use the variable.

In the chapter 3 script, we first assign a "value" to the variable using the "set" block then use the variable with the latest block.
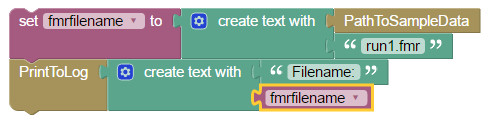
Running the script in BrainVoyager will result in printing the filename to the BrainVoyager Log tab.
A variable is a container which contain may change during your program. In the chapter 3 script, you assign the file name to the variable but, alternatively, you may use the block
 to load a file during the execution of the script by BrainVoyager.
Chapter 4 - Following the processing in BrainVoyager
In this script, we do not follow exactly the script presented in the manual. We prefer to let the user decide the image to play with while running the script, and we use a variable to hold the value of the target volume used for motion correction.
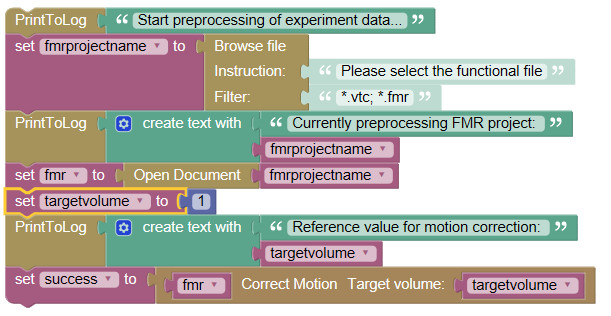
Running this script in BrainVoyager will result in the comment to be printed in the log, the fmr project to be open in BrainVoyager and corrected for motion correction.
The last variable, success, is a boolean variable which will be true if the motion correction is executed correctly, false otherwise.
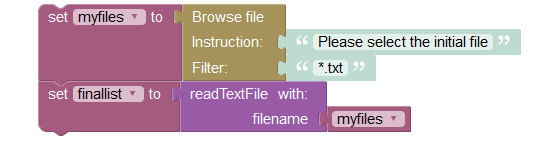
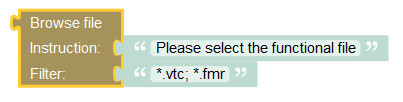
In the browse file block, you can adapt your file search by modifying the "filter" parameter. To look for all files, you may enter "*.*"
Using variable instead of directly the value, you can easily modify the value of the variable, only one line to change, and do not need to check all your script for other occurence of the variable/value.
Now, instead of writing to the log, we will write to a file.
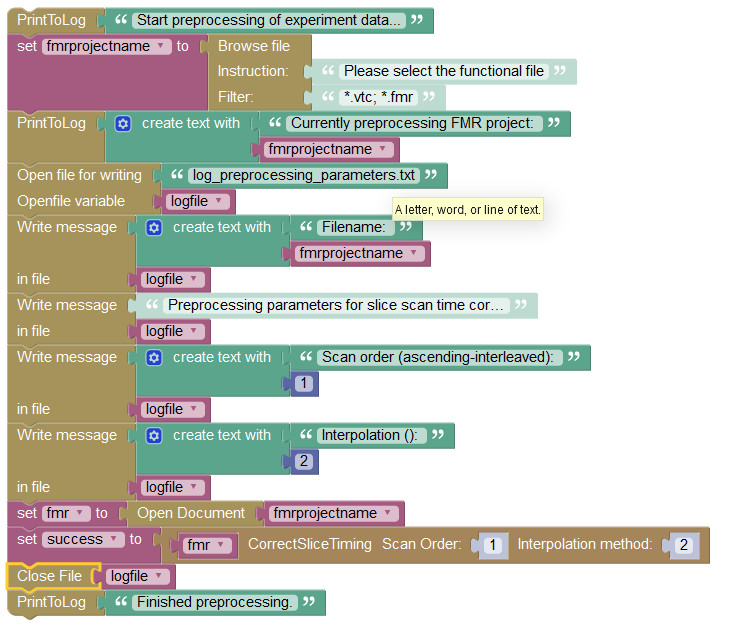
You first need to open the file for writing. A new variable is created by the block which contains the path to the file. This variable will be used by the script to indicate in which file it has to write. In such a way, you may open multiple files at once. Every "Write" block will write a single line to the file. When you finish writting to the file, you have to close the file.
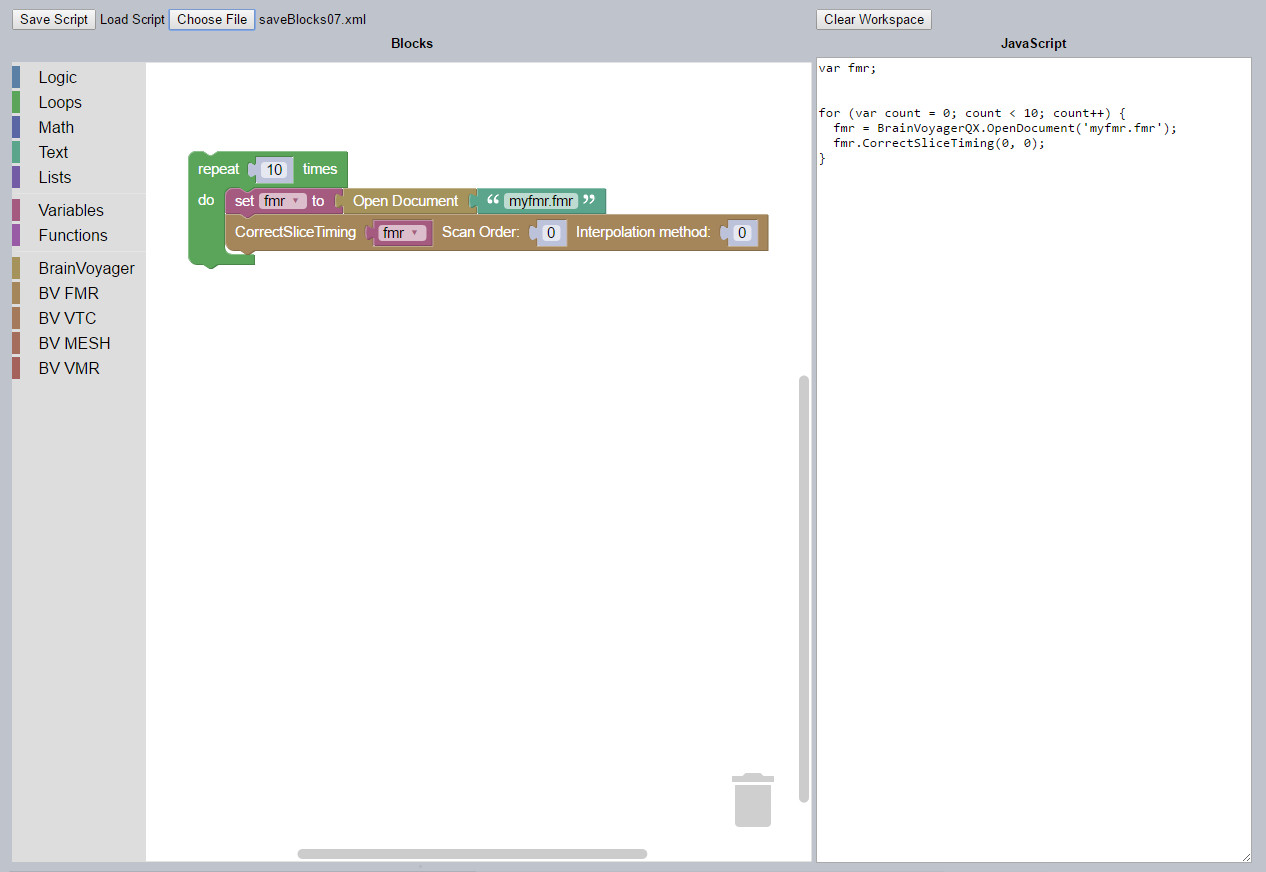
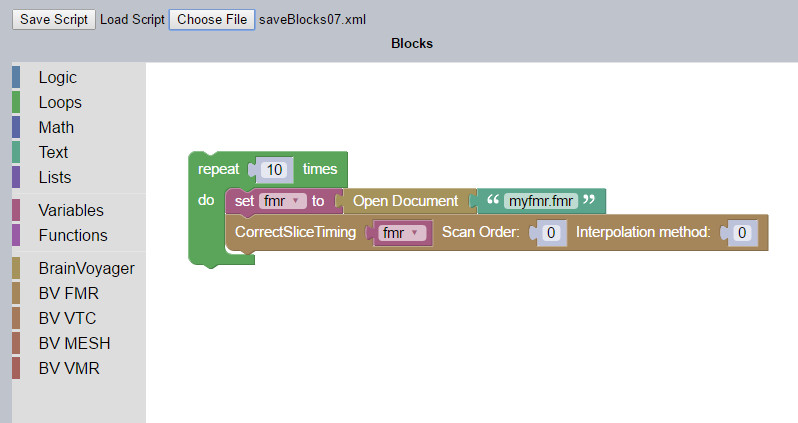
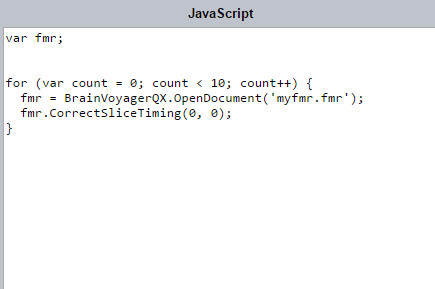
Chapter 5 - Preprocessing several files
In chapter 5, the script use arrays and loops for applying slice scan time correction to several files. To do this, the previous script are extended with a list and a loop. This approach allows to apply the same procedure to several files. Therefore we store the variables in a list, and process them one by one with a loop.
To create a list, first you have to create a variable. Then use one of the create list blocks. The variable may now contains multiple values.
The loop will assign one element of the list to the variable "i" which is automatically created when you use the loop block. You may rename that variable for clarity using the drop-down menu. "i" will then contain a file name. The value of "i" will change with each passage in the loop till all files have been processed.
Chapter 6 - Creating a function within the script
Sometimes, you have to repeat a couple of instructions several times in a script, or you need them in multiple scripts. In that case, you better write a function containing all these instructions and that you insert once in your script and call it when needed. Chapter 6 describe a function used to open a file containing a list of file to process. The first line contains the number of files and, then, one file per line.
		5

		filename1.fmr

		filename2.fmr

		filename3.fmr

		filename4.fmr

		filename5.fmr
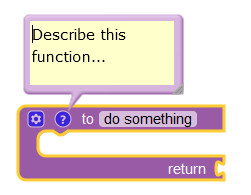
You first need to create a function. Here, select the block with "return" as it allows to return a value after executing the function.
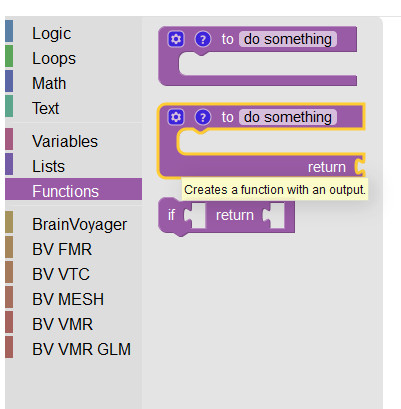
Replace do_something by a function name. Then, click on the ? and write a comment explaining your function. This comment will also be saved in the
script file. Click again on the ? to hide the comment.
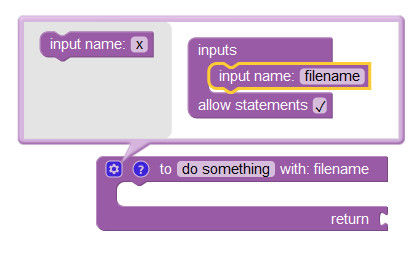
Our function will have to read a file. We want to give it the filename of the file to read as an input. Click on the "gear" to open a new menu allowing you to add inputs.
Select one input block on the left and insert it in the right block. You can change the x by a more appropriate name. Close the submenu by pressing the "gear" again.
A function will use variable as input. This allow a more universal use of the function. While calling the function, you can either use a variable or directly a value. You do not need
to use the same variable name when calling the function. The name given as input is for internal use only.
To write a function, insert your blocks in your function block. When the function is finished, connect a value or a variable to the return
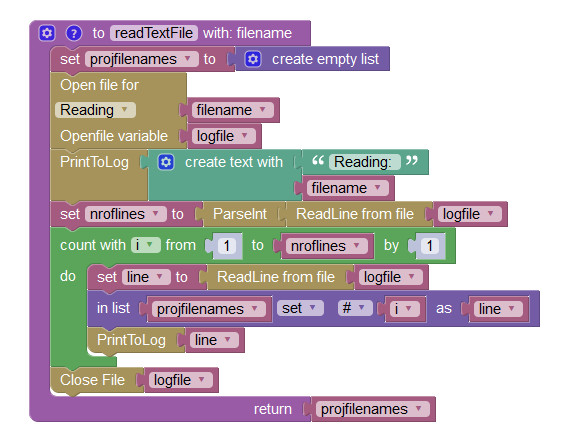
A short note on the use of list. If you use this function in Python, the list block, where the list is filled, will not work. The list usage is often tricky and prone to memory problem. In the present exemple, we increase the list by adding a new element to the a new position. This way work fine for Javascript but Python prefer the following alternative:

In both Python and JavaScript, i should always be the element right after the last element in the list
The function can be called from anywhere in your program.