GCM Help Pages
Before you start
Computing GCMs
Viewing GCMs
Interpreting GCMs
Advanced
More Help
Computing GCMs
Introduction
The GUI (Graphical User Interface) that the GCMPlugin currently provides to enter the main input parameters for computing GCMs is a series of sequential dialogs. The dialogs allow the user to continually add information (reference VOIs, conditions) and to signal when all information is added and the computations start. Continuous feedback about the selection-process is provided in the Log-tab.At the highest level the user provides a list of VOIs, used as reference regions, and a list of conditions that define over which time-spans the GCMs should be computed. A condition contains a definition of which intervals (possibly more than one) in which VTCs (possibly more than one) should be used to compute a (pooled) set of GCMs, presumably because some condition of the experimental task was performed by the subject(s) in these periods.
Schematically, the input to the GCMPlugin will be:
-
List of VOIs
- VOI 1 (e.g. Left_FFA)
- VOI 2 (e.g. Right_PPA)
- ...
-
List of conditions
-
Condition 1 (e.g. Faces)
-
VTC 1 (e.g. PP1_FaceHouse_Run1.vtc)
- Interval 1 (e.g. 12-56)
- Interval 2 (e.g. 104-162)
- ...
-
VTC 2 (e.g. PP1_FaceHouse_Run2.vtc)
- Interval 1 (e.g. 66-92)
- Interval 2 (e.g. 168-194)
- ...
- ...
-
VTC 1 (e.g. PP1_FaceHouse_Run1.vtc)
- ...
-
Condition 1 (e.g. Faces)
- Batch the computation of the same GCMs (i.e. over the same conditions) for different VOIs in one run of the GCMPlugin
- Estimate GCMs pooled over different runs of the same experiment (i.e. multi-study GLM)
- Compare GCMs computed over different conditions for the same VOI(s) to find task-modulated differences in directed influence (see Interpreting GCMs)
Running the GCMPlugin
When installed, the GCMPlugin can be run from the Plugins menu, listed as 'Granger Causality Mapping (GCM)...'. The GCMPlugin has three run-time prerequisites:- An active VMR project
- A linked VTC file
- A loaded VOI-list
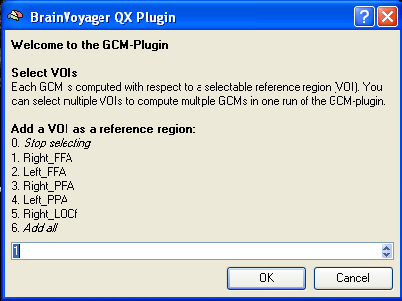 |
| The GCMPlugin VOI selection dialog |
The VOIs present in currently loaded VOI-list in BVQX (accessible via the Analysis->Region-Of_Interest Analysis... menu or Ctrl-R when the GCMPlugin is not running) will be listed in the VOI selection Dialog. You can select VOIs as a reference region by their number. The VOI selection dialog will keep returning untill the 'Stop selecting' option is chosen. Alternatively, to select all VOIs in the current VOI-list, the final option 'Add All' can be chosen, after which the GCMPlugin will immediatelly continue. Feedback about selected VOIs is given in the Log-tab.
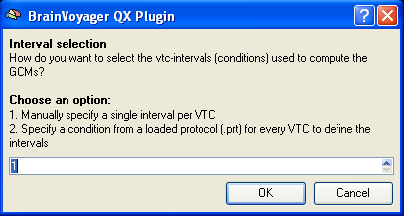 |
| The GCMPlugin interval selection mode dialog |
After the VOI selection process, the Interval selection mode Dialog will appear, asking you how (and how many) intervals within a VTC are to be selected. Two options are available. The first allows only one interval per VTC in a condition. You will be asked for the first and last volume of the included interval after every VTC you specify. The second options allows multiple intervals per vtc, and will read these intervals from a protocol (.prt) file. You will be asked for a .prt file and a condition within the protocol that contains the included intervals after every VTC you specify (see below).
 |
| The GCMPlugin add condition dialog |
Then the cycle of adding conditions (and adding VTCs to conditions, and intervals to VTCs; see the schematic overview in the introduction) starts. Continuous feedback about the selected condition structure is given in the log-tab. Each loop of the cycle will ask you to specify the name of a condition (e.g. 'Faces' or 'Run1'), or, to press OK while leaving the name field empty to stop adding conditions. Pressing Cancel will terminate the Plugin. At least one condition must be added. A cycle of adding VTCs to the new condition is then started with an file-open dialog. Pressing Cancel in this dialog stops the cycle of adding VTCs to the last condition, and will make the GCMPlugin continue to the next cycle of adding a condition. (This is the only time when pressing Cancel will not terminate the Plugin. Confusing, perhaps, but necessary, since there was no other way of signalling that all VTCs have been added to the current condition.) After selecting a VTC in the file-open dialog, you will have to specify the interval(s) in this VTC used for the GCM computation for the current condition.
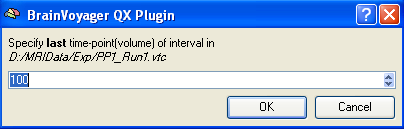
Eitherinterval selection mode 1 |
 |
|---|---|
 |
|
| The GCMPlugin specify interval begin and end dialogs | |
Orinterval selection mode 2 |
 |
| The GCMPlugin select protocol condition dialog |
The way of adding intervals for a VTC depends on the choice of the interval selection mode made earlier. If interval selection mode 1 was chosen (a single interval per VTC), two dialogs will appear asking for the beginning (first volume) and the end (last interval, inclusive) of the interval. If selection mode 2 was chosen (multiple intervals per VTC, as specified by a protocol (.prt) file), a file-open dialog will first appear asking you to specify the .prt file that contains the intervals to be used in a single condition. Subsequently, the select protocol condition dialog will ask you to select the condition within the selected protocol that contains the required intervals. All intervals defined in the selected condition will be added to the current GCM condition for the currently selected VTC.
An important consideration is that the GCMPlugin eventually needs all its intervals to be specified in volumes (as an inclusive first-last pair). If a selected protocol file has millisecond resolution the GCMPlugin will convert the millisecond precision begin_ms and end_ms to first and last volumes (first_vol and last_vol) by the following transformation:
first_vol = round(begin_ms / TR) + 1
| |
The result (first and last volume of an interval) of this transformation should agree with what BVQX gives when converting from millisecond resolution to volume resolution in the Stimulation Protocol dialog. A warning will be issued that a conversion was performed, and that the resulting intervals should be checked. A requirement that must be met by every interval (beyond trivial ones, that last>=first and 1 <=first,last<=NrVolumes) is that
first_vol - last_vol + 1 > AR_order | |
Where AR_order is the order of the auto-regressive models that are estimated to compute the GCMs.
|
In depth Estimation of AR models of order AR_order requires computation of auto-correlation series up to AR_order, which, in turns requires time-series of at least AR_order+1 time-points. Furthermore, since the auto-correlation of AR_order is estimated from the average cross-product x[t]*x[t+AR_order], the effective number of data-points available to estimate an AR model from is N_Timepoints - AR_Order. Although the GCMPlugin will pool the estimates for all the intervals in a condition, this is true for every interval. The effective number of data-points for the estimation of a condition GCM is the sum over the condition-intervals of Thus, the effective number of data-points (and statistical power) will be lower for 10 intervals of 10 points, than it is for 1 interval of 100 points. The GCMPlugin will record the effective number of data-points for each condition in the log-file it writes out with every .gcm file (see below). | |
After adding the included intervals in the current VTC for the current condition, the GCMPlugin will return with the file-open dialog to add the next VTC to this condition. As noted above, pressing Cancel will end the selection of VTC for the current condition.
After adding all conditions, with all their VTCs and intervals, pressing OK in the Add condition dialog while the name field is empty will end the condition-selection cycle. The final step in the parameter selection process is specification of a location and a name-prefix for the result. A file-save dialog will appear where you select a location for all resulting files and, in the file-name field, a prefix that will be prepended (along with an underscore ("_") separator) to all written files. The prefix can be used to put subject, experiment, or computation-level specific information into the resulting file-names for easy recognition. Pressing Save will initiate the GCM computations.
Feedback about the progress of the computations is provided in the Log-tab. Basic information about the computations is also provided. Particularly, for each computed set of GCMs the GCMPlugin will report:
- Voxels skipped
The number of voxels that were skipped because the first time-point in their time-series (in ANY of the VTCs in the relevant condition) was below the exclusion threshold (see Advanced) - Voxels ill-defined
The number of voxels for which the (joint) VAR model estimated over voxel time-course and reference time-course is ill-defined. This might happen in case of zero (or extremely low variance) time-courses, or when a voxel time-course is exactly equal to reference time-course (when a reference VOI contains only a single VTC voxel). More than a few ill-defined voxels can point to a problem in your data or input specifications that the GCMPlugin could not handle - Surrogates ill-defined
Very similar to Voxels ill-defined, except that this number refers to the number of (joint) VAR models that were ill-defined when a voxel time-series was paired with a surrogate reference time-series. Surrogate reference time-series are simulated to allow computation of a bootstrapped NULL-distribution for non-parametric inference (see Advanced). In absence of any ill-defined voxels, more than a few ill-defined surrogates can point to a problem in your reference time-course (i.e. reference VOI specification) that the GCMPlugin could not handle
The GCMPlugin will write a .gcm file for every selected VOI, each one containing GCMs for each specified condition (see Viewing GCMs). The files will be named using the convention <prefix>_<VOI-name>.gcm. In addition, a .log file will be written for each .gcm file with the same name. The log is a text-file with a report of all relevant parameters used in the computation of a .gcm file, for later reference.